


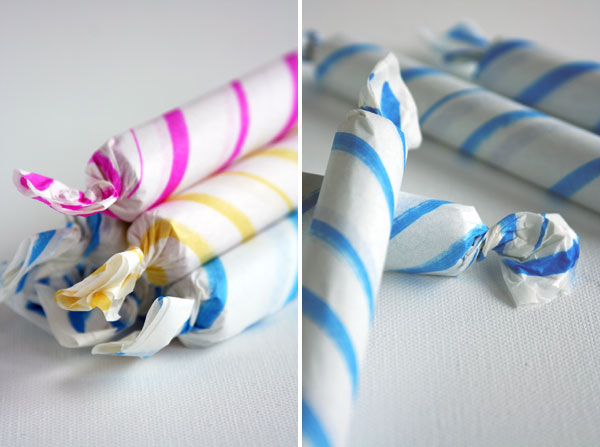
I’m not always the best planner when it comes to birthdays. Some birthdays come, I’ll have an idea in mind long beforehand and it all works out great. Other birthdays come and I’m scrambling for time to put something cute together the night before. These repackaged mentos favors were one of those late night ideas that turned out cute, are easy to make and need just a few materials!


Materials needed: tissue paper, bright colored markers, mentos (or any other candy you’d like to use)
Step 1: Cut your tissue paper to the right size of your chosen candy. Leave enough room on the sides to twist the ends.
Step 2: Carefully remove the outer layer wrapping of the mentos. This way the foil wrapper is still around and you don’t have to touch the candy.
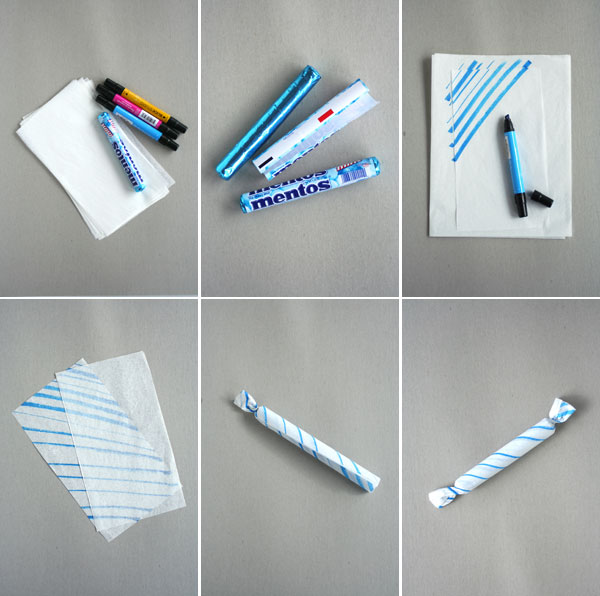
Step 3: Draw quick lines diagonally on one sheet of tissue paper. Quick lines really turn out the cutest! No reason to measure, imperfections and a combination of thick and thin lines give the best result.
Step 4: Back your marked sheet of tissue paper with a clear sheet of tissue paper.
Step 5: Roll the mentos roll into the 2 sheets with the marked sheet on the outside.
Step 6: Twist the ends closed…that’s it!
These favors are perfect when you need to make big quantities, it’s so quick! And much more fun to give than a regular roll of mentos! Wouldn’t they be cute for a rainbow party in even more colors?


amanda
October 27, 2011
Love this!!! Such a good idea!
Ridgely's Radar
October 27, 2011
What a great idea! These look so cute!
Eliza
October 27, 2011
Good idea! This would make brilliant gifts for party bags (and keep them low cost!)
http://buenodia.com/
Sheila
October 27, 2011
This is such a FANTASTIC idea!!
sami
October 27, 2011
such a cute way to give out candy! i always have extra tissue paper that never goes to any use!
xo
sami
Hannah @ Sparrow + Spark!
October 27, 2011
Really sweet idea, definitely one to use!
DeAnn
October 27, 2011
cute and simple
Molly @thewaffler
October 27, 2011
I totally thought you had bought the wrappers…love that it is by hand.
Danielle
October 27, 2011
Haha what a cute and simple idea – love it.
Ooooh I do love mints, they’re really addictive.
Sometimes I wonder if my granddad is to blame for my addiction, whenever I see him he always whips out the curiously strong mints and force-feeds them to me. Then he tells me off for eating all of his mints when he’s on a pension. But if I don’t eat them then I’m mean for not taking mints off an old man – I can’t win! Hahaha
x
http://fandabbydozie.blogspot.com/
Mary
October 27, 2011
so simple but very cute! it’s a good one i’ll have to keep in my back pocket.
Thank you!!
Sarah @http://agirlintransit.blogspot.com/
October 27, 2011
Perfect for the holiday season coming up. I love simple and sweet ideas like this. Excellent job!
-Sarah
http://agirlintransit.blogspot.com/
Brigette
October 27, 2011
o my gosh this is too cute and so simple! i may use this idea at christmas time, how cute would the red and green look!
Erin
October 27, 2011
What a great idea! I am definitely planning on incorporating this into some parties coming up. Thank you so much for sharing!
http://www.whatdoIwanttodotoday.com
iva| in my studio
October 27, 2011
They are so simple yet so cute. Would make good decor for a kids party
Cher
October 27, 2011
WOW! I am definitely trying this idea !
bevy
October 27, 2011
simple but cute! perfect! I’m thinking red/green stripes for Christmas.
Tanveer
October 28, 2011
I just love your ideas Jordan!!! I have been religiously following your blog for the past couple of months and I have tried a lot of your DIYs. Your blog makes me so happy:-).
Thank you! That is so nice!
Anneke
October 28, 2011
This is such a great idea! I love how they turned out, with christmas coming up theses could make great stocking fillers 🙂
Cecilia
October 28, 2011
How sweet! And so customizable 🙂
Anneliese
October 29, 2011
Oh wow! This is so perfect, and simple, and brilliant–thanks for for thinking of it and sharing it!!
Jessica
November 1, 2011
I made these and the golden alligator pinata for my husband’s birthday party last weekend and they turned out great! Everyone thought both things were so cute and clever. Thanks for all the fun ideas!!
Liesbeth
November 9, 2011
Joke! Toen ik deze post aan het lezen was, dacht ik: dit zou iets van Joke van Tokketok kunnen zijn. Pas toen ik de URL van de post gesaved had (want ik wil hem graag rebloggen), zag ik jouw naam! Ik kende je familienaam niet, maar het kon haast niet anders dan dat jij het was. Ik zweer het je!
Ik heb je blog trouwens via Bonnie Tsang leren kennen. Oh, wat is de wereld toch klein! 🙂
Groetjes uit België,
Liesbeth