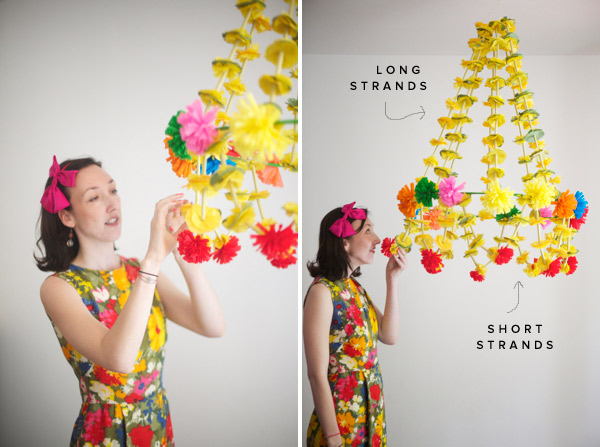
A month or two ago I made this giant Polish Chandelier (see all the pictures right here.) I meant to post it earlier so sorry to everyone who has been patiently waiting for the DIY post. This project isn’t fast but its made of cheap materials, so its perfect for someone who doesn’t have a lot of money to spend but has some time on their hands. My favorite thing about this is there is so much variation in the different pieces that I felt like I was doing so many types of crafting just for this one project. It was really fun and satisfying to make. I think these would be so cool at a wedding, it would be sweet to put one above each table. See all the instructions below!
Materials Needed: 36″ hoop (or we bought some thick wire and taped it together to create our own.), crepe paper folded sheets (not rolls) in the colors of your choice, tissue paper, thin cardstock, glue, string, a long needle, tape, scissors, fine gauge wire.
1. If you want to make your own hoop just measure out 36″ and wrap the wire around the circle several times until it feels sturdy then tape it together.
2. Wrap it in crepe paper to make it pretty.
The chandelier is broken down into three kinds of pieces: straws, stars, and flowers. Once you know how to make them you just configure them in different ways.
3. It is possible to buy real straw for this but I couldn’t find any so I made my own out of paper. To make the straws you’ll need some cardstock cut unto strips (about 4″ long) , a pencil, and glue.
4. Roll the cardstock around the pencil to shape it.
5. Then add glue and hold until it sticks. I made 130 of these for my chandelier.
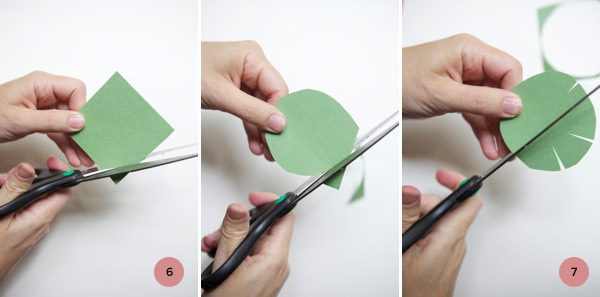
6. Now for the stars. I made these stars out of tissue paper and then out of cardstock. Start with a square about 3″ wide and cut a circle out of it. I usually cut these in a stack to save time.
7. Then cut out little slivers to make the little petals.
8. When you are done with the cardstock make them out of tissue. I didn’t count how many I made of these but it was a lot. I made a hefty pile and then would make more when I ran out.
9. The flowers are fun to make. You need some crepe paper and wire for this.
10. Start with some strips of crepe paper and begin rolling. Focus on making one side tight and the other end a little looser.
11. Pinch the tight end. I keep the finished petals in one hand while I roll with my other.
12. When you have 10-12 petals wire them together a few times around as tight as you can. Keep adding bunches and wiring it on until the flower gets big enough.
13. Secure the wire by twisting it but leave the tails of the wire attached for when you are assembling it later. For mine I made 16 large flowers around the rim and 8 small flowers for the bottom.
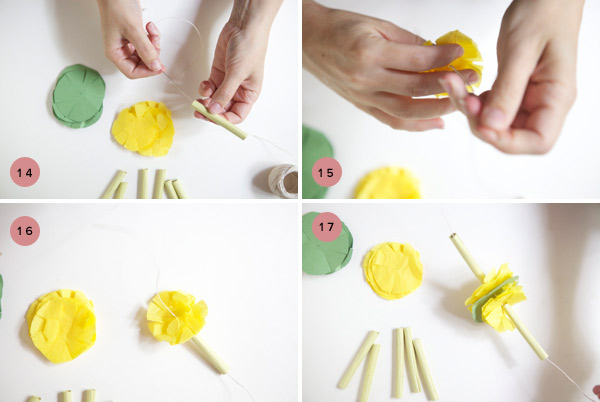
14. To make the strands first thread a piece of straw.
15. Then add some tissue stars.
16. Crumple the tissue paper to give the stars body.
17. Then add a star made out of cardstock and sandwich it with some more tissue. Repeat.
18. There were a total of eight long strands (ten straw sections each) and eight short strands (which had six straw sections each.)
19. Attach all eight long strands evenly around the hoop and bring them all together at the top in a knot. Then hang the chandelier from a doorway while you finish the assembly.
20. Attach the eight short strands on the hoop between where the long strands are attached. They scallop around the bottom in a ‘U’ shape.
21. Finally attach the large flowers with wire everywhere a string attaches to the hoop. Top it off by adding a little flower to the bottom of each ‘U’ or short strand.
And voila’! You’re done. Of course play around with the colors and design of yours. Traditionally Polish Chandeliers have eight strings but other than that you can add flowers or change colors to your liking. Happy Crafting!
Thanks to Anne for being my model.


emily cox
August 11, 2011
Jordan– this is amazing. Thank you! Roughly how long did it take? (I’m guessing a loonnng) time.
{plum}
August 11, 2011
you, Ms. Jordan Ferney, are a DIY DYNAMO!!! I’d give my right arm (i’m left-handed) for half your talent.
I must thank you for your earlier DIY project – potato, potahto. I gave a go at this project and am tickled by the result. Thanks for inspiring!
http://plumlife.typepad.com/plum/2011/08/diy-done.html
best – d.
post script: don’t forget, shoulders back.
Kirsteen
August 11, 2011
Wow. Completely agree, these would look amazing at a wedding.
jordan
August 11, 2011
It took a while. I think I spent 3 or 4 long evenings on it.
The New Diplomats Wife
August 11, 2011
I’m Polish and I have one of these (in a ball form rather than chandelier) in my daughter’s nursery – it’s a great way to bring in color in a sweet way.
Stella
August 11, 2011
oh wow. what a great way to bring color to a room! It sure brightens up any (grey) day!
victoria
August 11, 2011
adorable!!
veeda
August 11, 2011
Jordan, you have the greatest DIYs.
Risamay
August 11, 2011
How fun! And awesome that you got to model, Anne!
ana {lucky in love sf}
August 11, 2011
you always have the best DIY. looks like if i start now I can have about 10 done for the wedding 🙂 keep em comin !
Meg
August 11, 2011
So lovely!
Babs Blog
August 11, 2011
This is so fun! A great DIY, too. I want to spend the rest of the day making these for my office…too bad I have to get some work done today. 🙂
Katie
August 11, 2011
Love this! Too cute! xo
Beth S
August 11, 2011
Oh, I’m so excited!! I’ve been dying for this DIY to be published ever since I saw the final product on your blog! Thank you!
Kate
August 11, 2011
That’s so cute!!! Love that the model’s dress matches… do you think of EVERYTHING?! 🙂
-Kate
http://www.cinnamonink.blogspot.com
Kerry
August 11, 2011
Thank you! I just heard of these in the past year and my husband is half Polish. I am looking forward to making these throughout the years to help my children celebrate their heritage.
Erika Peterson
August 11, 2011
Your creativity astounds me!
asnipofgoodness
August 11, 2011
This is so crazy beautiful, I really love it, you are so right, it would be amazing for a wedding!
Wind and Willow Home
August 11, 2011
So Fun! This would be great for an outdoor party.
Hannah
August 12, 2011
Really pretty!
Zoe {Conversation Pieces}
August 12, 2011
Amazing… makes me think of hawaii! 🙂
Amy
August 12, 2011
Love it! And I LOVE that dress. I’m going to be thinking of that dress all day!
Marysia
August 12, 2011
Great tutorial ! As they say in Poland: ” dziękuję ” ! Thanks !
Roma
August 12, 2011
So pretty! I know this kind of things 🙂 There is a link to the page with similar artworks of Polish folk artist: http://www.arts-fun.pl/gal_latowska_stanislawa.html Pozdrawiam 😉 from Krakow, Poland
Pearl
August 13, 2011
oh wow. that is just way to cute. Thats what was missing at the birthday Luau!
♥
Pearl
isabelle
August 17, 2011
Your “paper spider” is beautiful (it is how Polish people call it), I wanted to buy one since long now I think I am going to make it myself. Thanks for the tuto !!