This post is by our lovely contributor Rebecca Wright of Animal Head Vintage. All Photos by the talented photographer Robyn Kessler for Oh Happy Day.
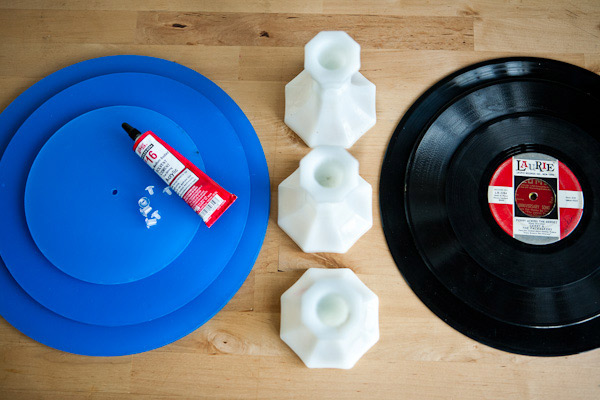
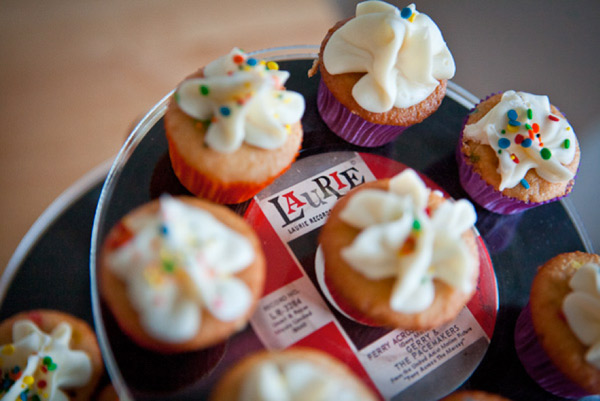
I thought it would be fun to display cupcakes or other treats on records, but didn’t necessarily want my food sitting directly on a record (or the pretty paper center) since it seemed hard to wash afterwords. I decided to use two pieces of acrylic on either side of the record to really make a sturdy design that was easy to wash, AND easy to switch out the records depending on my mood or the theme of the party.
Items Needed:
Records! (you can use 12″/10″/7″)
Two pieces of clear plexiglass acrylic (cut to size, with a hole drilled directly in the middle)
A sturdy base with a flat top (I used thrifted candlesticks)
Clear screw fastener (I used 3/8 in. and cut them down a little for a perfect fit)
A strong glue
Step One: Take the plastic off your freshly cut acrylic, and place one piece on each side of your record to make sure it fits. You’ll have a little record sandwich, with the holes lined up in the middle.
Step Two: You will be attaching one of the pieces of acrylic to its base permanently, so you’ll need to glue the bigger half of the screw to the piece of acrylic that will be glued to the base, and make sure that it is good and stuck. After this step, you should have one piece of acrylic with the longer part of the screw glued into the hole, and then you’ll glue that piece of acrylic to your base. Let that glue set.
Step Three: Once the glue has hardened, place the record and the other piece of acylic onto the base acrylic, screw the plates together with your clear fastener, and make sure it holds the plate together firmly. You have a cake plate with a top layer that can be unscrewed for washing. There you go! Then just stack them for some pretty tiers!
Pro-Tips: Wondering where to get acrylic custom cut? I used TAP Plastics but check in your area for a plastic store. When you do wash acrylic, be careful not to scratch the surface. You can use recommended cleaners such as Novus #1 or Brillianize, though a mild solution of dish detergent and warm water with a soft cloth should do the trick just fine. Never use cleaners containing ammonia, such as Windex or 409.
In case you missed it: see how to make flags out of record sleeves right over here.


Pâtisserie Paris
August 17, 2011
Such a great idea!
Margaret, Enrout
August 17, 2011
This is genius beautiful Rebecca. Congrats!
Mila
August 17, 2011
Love this idea.
Thanks for sharing it.
Meg
August 17, 2011
This is so fun! Love the colors!
Heather
August 17, 2011
Love this… can you tell me more about where to get the acrylic? How did you cut it?
Lesley
August 17, 2011
I LOVE THIS! I’m a bit intimidated by the vinyl but i’m sure that’s something I can acquire somewhere.
margaux
August 17, 2011
genius! love it. i am now also in the mood for cupcakes 🙂
Eva / Sycamore Street Press
August 17, 2011
Great DIY, Rebecca! Sandwiching the records between acrylic is genius.
Bonnie
August 17, 2011
Oh my word! I love it. Going to pull out my record collection & get busy!
Brigette
August 17, 2011
Brilliant idea dear! I have a giant vintage record collection, can’t wait to try this!
Jennie Kwon
August 17, 2011
Just wanted to say thank you for your site. I can spend hours upon hours browsing your amazing ideas. I’ll be planning my twins’ first birthday soon and will definitely be putting these to use!
Becky
August 17, 2011
Adorable- perfect for my music loving hubby’s birthday party! Thanks for the beautiful how to!
bettijo @ PagingSupermom.com
August 17, 2011
What fun!! Such a cool idea… thanks for sharing 🙂
Caroline
August 17, 2011
Clever! I like it! I like it!
I had a collection of Disney records when I was a child that each had a design–like a scene imprinted on the actual record. How cool would it be to score some of those via ebay/”antiquing” for a child’s party!
GREAT inspiration! xo
Hannah @ Smith+Scout
August 17, 2011
Love it! Great idea.
respiratory therapist
August 18, 2011
What a very wonderful idea! It’s beautiful and really adds interest to the cupcake plate. Thank you for the tip on how to properly wash acrylic. Very, very helpful info.
Ridgely's Radar
August 18, 2011
So cute! Love this idea!
jenn {bow tie & bustle}
August 18, 2011
SUCH a good idea!!! gonna have to try this one!
Brooke
August 18, 2011
This is so rad! I <3 your awesomely unique idea. I made bowls out of melted records, but this is so cool! I am so trying this for a fun friends Birthday party! ;p
xo Brooke
http://stylespook.blogspot.com/
desiree - vosgesparis
August 19, 2011
this is really fun!
Barbie // Birdsofalovelyfeather.blogspot.com
August 19, 2011
Love this!
claire
August 19, 2011
This is awesome!
UpGemini
August 20, 2011
this is a very cool idea… and by the way, I like your blog! 😉
White spots on skin
August 23, 2011
Your post is really nice Home remedies for anorexia
Elisa From Chile
August 28, 2011
Wonderful Idea. I am so happy I found this place. I am having a 70s disco party to celebrate my 5oth birthday and I will make some of this. THANK YOU so much for sharing this great idea.!!!!