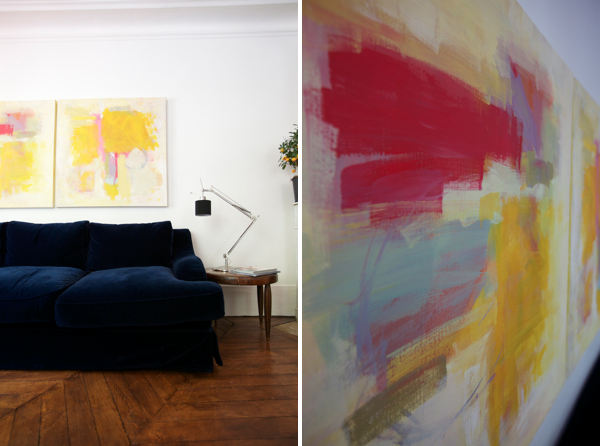
Here is the second installment of a series I’m doing on how to make affordable art (the first was this modern potato print artwork.) If you can I recommend buying art from professional artists. (Full disclosure my husband is a professional artist!) But until you can afford the abstract piece of your dreams here are some tips on making your own.
Materials Needed: 2 Large Canvases 40″ x 40″ $20/each, a few large brushes 2.5″ wide $5, several tubes of acrylic paint $4/tube In total this cost $70. That’s $35 each for a huge piece of art. There are no framing costs because with canvas like this you don’t need to frame it.
A few notes: I know abstract art looks “easy” but anyone who has tried it can attest it can be difficult to get just right. I would recommend getting some cheap small 10″x 10″ canvases to practice color and composition and technique before you you try it on a big one. This will save you time and money in the long run. This project does takes a while. It took us 5 painting sessions that ranged from 1-2 hours. Take your time and keep in mind you are working in layers.
Step One: Tone the Canvas. The first layer you’ll tone the canvas with another color other than plain white. This is so when the underpainting shows through it will show texture instead of plain white. For this we just mixed lots of yellows with white and grey. We used lots of water and were sloppy and just tried to have variation. We also painted the edges. Then let it dry.
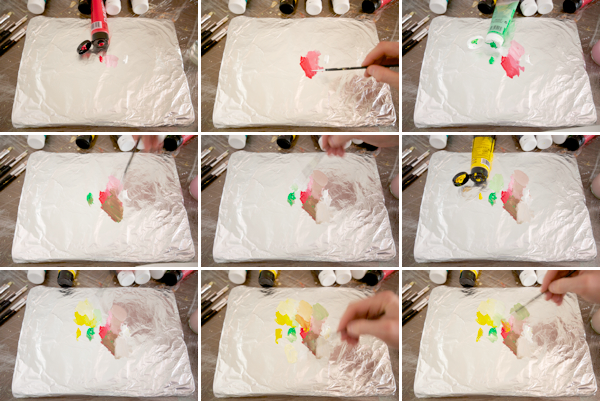
Step Two: We sat down and drew out with pencils some compositions we liked. We didn’t totally stick to this but it was nice to have a guide to start off of. Once we had a plan we began blocking out some colors. A big part of this project is getting comfortable mixing paint. I’m not very good at it and have to depend on Paul a lot to get the colors I want but basically you start with a base color and add other colors to lighten or darken. I had Paul mix some paint to demonstrate. Here he used white, red, yellow, and green to get all of these colors. Make sure to add extra water to thin out the paint. You can add smudges and streaks on that layer without thinking about it too much since its only the second layer. Then let it dry.
Step Three: Now you’ll want to start to get more serious about what it looks like. Sometimes abstract art looks simple but after working through a few variations we found our favorite compositions seemed simple but when we actually looked closer and broke it down it was made up of complicated shapes. For example look at the painting on the left. The red and the blue look simple but in the close up you can see there are lots of layers and streaks and lines so that it looks interesting. Keep making small adjustments until you like it. One time we didn’t like the painting but went to bed and when we woke up we actually loved it. So if you are getting frustrated take a break and come back when your mind is clear. Be experimental and keep trying things (adding white etc) until you are happy with it.
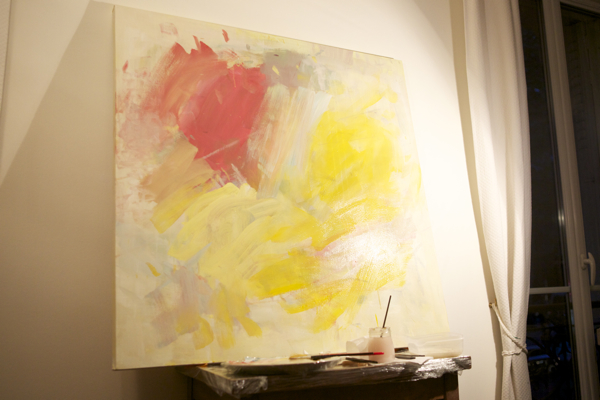
Step Four: We started to play around with the colors we wanted to compliment the top layer. You can see we also went through and lightened up the edges with some off white paint ro make the painting feel brighter. At this point we were starting to like it but it needed to feel pulled together.
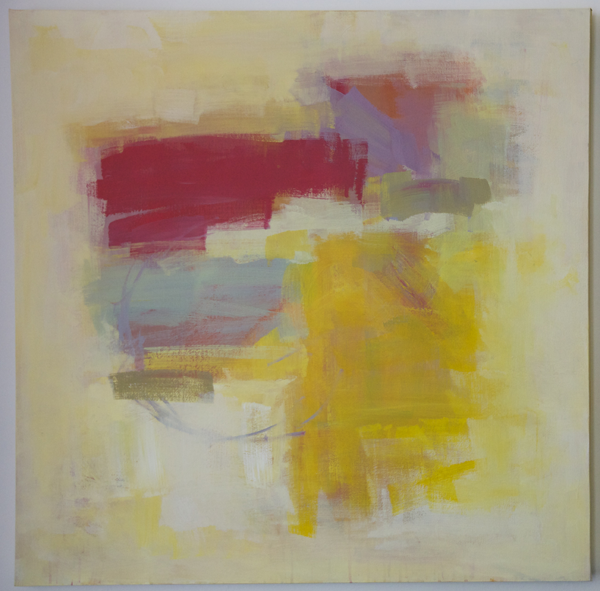
Step Five: In the final painting session we tried to perfect the composition. Our technique was to block in some brighter colors and then make them meet in interesting ways with different lines and shapes. Here is how the final turned out. You can see that with the final layer there are 15-20 colors and 12 or so blocked out colors in the center. The main thing is to keep trying different colors and shapes until you are happy with it. Et voilà! Your artwork is complete.


Destri
July 18, 2011
Okay, not normally a fan of abstract, but I am loving this :). It looks amazing!
Destri
July 18, 2011
One question; when I was in Paris, someone had mentioned there was a store where you could buy paintings from students who were studying paintings at the Louvre and around Paris, have you heard of this? If so, is there an online source? Thanks so much for any input!
Jessie
July 18, 2011
Both your artwork turns out great! Love the tutorial.
Jessie
http://www.mixandchic.com
rooth
July 18, 2011
What a clever teach in and a fantastically plush and deep couch!
Rachel Schindler
July 18, 2011
Oh, thank you, thank you. I have been wanting to try my hand at painting. Thanks for the tip on starting off smaller and the step by step pics. Now I just need some courage and a little push…
Biscuit
July 18, 2011
I just spray painted some picture frames, but painting my own art sounds like even more fun! I’m definitely going to start looking for canvasses at my art store! Thanks for the idea! =)
miniNigella
July 18, 2011
waow, it looks super great………I’m impressed…….
Sara
July 18, 2011
So fun! I have done this, and learned the hard way the first step you mentioned about painting the entire canvas first. On my first attempt, I had wanted a white background but foolishly didn’t realize that it would just look unfinished without the whole canvas painted. Love how yours came out!! Thanks for sharing your tips!
Sarah
July 18, 2011
This looks beautiful! Curious as to if Paul will start painting and selling some abstract.
Jenna
July 18, 2011
They look great! Our new house is in need of some artwork and this just might be the perfect project! Thanks so much!
fran
July 18, 2011
thanks so much for this! i was wanting to try abstract art, and your tutorial is going to make things so much easier!
jaclyn @ thelateafternoon
July 18, 2011
love this project – the colors you picked are fabulous! i just moved to a new apartment and am in need of some art!
shalini
July 18, 2011
They turned out great…thanks for the tutorial.
rebekkah
July 18, 2011
i say do both! support artist everywhere AND make your own! 😉
such a lovely project! thanks! x x x x
kelsey
July 18, 2011
I LOVE THESE. totally going to try it. I might have better luck with my 2 year old helping though..
Andrea@FancyThat!
July 18, 2011
Pretty pretty! I’ve been making all my own wall art too as I can’t splurge for artwork while buying new furniture.
jacquelyn | lark + linen
July 18, 2011
these look amazing!!
Kacie
July 18, 2011
You AMAZE me! Love this. And the polka dot potato art! Wow.
Kacie
http://acollectionofpassions.blogspot.com/
Heather HS
July 18, 2011
What a great tutorial! I’ve been wanting to try something along these lines, and it is super helpful to have some tips to help! I knew it wouldn’t be as easy it looks, but I didn’t realize how many steps it would take.
elise
July 18, 2011
wonderful post!!
Andrea
July 18, 2011
great idea!!
lamina @ do a bit
July 18, 2011
LOVE these.. the colours are totally fantastic!! Makes me want to have a go!!
Great turorial too… thank you 🙂
DENISE.
July 18, 2011
Thank you sooo much for this post! I’ve really been drooling over some pieces just like this lately and wondering if I could do it myself! Thanks to you, I’ll try.
jenn
July 18, 2011
great tutorial and I like the finished art too!! I know how hard abstract art is. My final painting class we stretched our own canvas (I made mine 3’x4′.. thinking bigger is better). then I decided I wanted to do an abstract painting, thinking it would be easier… boy was I wrong. Under the final piece are about 5 other abstract paintings!
Rebecca
July 18, 2011
Thanks for the awesome DIY – can’t wait to try this out!!!
Rebeca
July 18, 2011
Looks beautiful!!!
Cheap Oakley Sunglasses
July 18, 2011
Thanks for the awesome DIY – can’t wait to try this out!!!
Misha
July 18, 2011
I’m totally thinking that my artsy-fartsy husband could totally take this on with our children. We DESPERATELY need some wall art and I have no idea how to start picking art. I want something that MEANS something, ya know? And my husband and children splashing paint in odd places would def do that for me. thank you for sharing this!!
Jo
July 18, 2011
WOW. I’m not sure I can do this but it sure is worth a try for my new place!! Thanks! 🙂
Melissa@Julia's Bookbag
July 18, 2011
I utterly and completely love this. Thank you!
Amy Thompson
July 19, 2011
Jordan, these are so great; I love them! I did a similar tutorial for Barilla, but with tips about helping your toddler create “modern art.” You can see the video here: http://us.piccolini.tv/video/childrens-fine-art/ I love your colors:)
Melissa
July 19, 2011
Thank you SO much for this! No more excuses–time to DIY. 🙂
Holly
July 19, 2011
I just emailed this post to my husband so he can read for himself what we will be doing soon. I am wondering how mine will really turn out; thanks for the tutorial!
This girl loves to Talk
July 20, 2011
ok so perhaps this diy just talked me out of it!! LOL. I totally know art is hard (I’ve tried painting several times since I was good at it in high school but I always want a painting to appear straight away and have lost my patience (maybe its the four kids!) – back when we used to work on a piece for months at school!!) and now you’ve convinced me how hard it is to do even abstract!
I agree that when visiting an art gallery how easy it is to say ‘pffft.. I could totally do that…’ but the reality is no, no I cant!! lol. But thanks for the tutorial on how to slow it down and take our time and really try to get a great composition.
mhayes
July 20, 2011
Fyi…when I was in school I was chastised for calling the above type of art “abstract” it is in fact, non representational art. Abstract art still has the essence of what it represents and can be identified as some type of subject matter. Non-representational has no recognizable subject but is more about color, negative/positive space, etc. Just thought you might find that interesting! 🙂
Jenna
July 20, 2011
Absolutely beautiful, can’t wait to try this out!
l'atelier13
July 21, 2011
at least as good as a rothko… wow, that’s amazing!
Lollitree Art & Design
July 21, 2011
I love this! I do mostly graphic art prints and only paint occasionally, but this is really inspiring. I have a huge canvas I’d like to do for my son’s room, and with this inspirational tutorial I might just let him help me! I’m sure it won’t look as professional, but it will certainly be worth hanging!
mer
July 22, 2011
very fun with great results. I’ll have to give it a go.
hannah
July 22, 2011
i’m really loving your color combos on both! i bet your pro artist hubs is super proud 😉
Roberta
July 24, 2011
Wow I love this so much, I would love to give this a try
Kirsten @ Triple Max Tons
July 24, 2011
WOW! Your paintings turned out really well….looks like some of your hubby’s talents rubbed off on you. They look really nice!
Skinny Jeans Mom
July 24, 2011
I am in LOVE with this blog and this post, how COOL is that?! Amazing!
I’m a busy working mom of a toddler and being a lover of style and all things girly, I work hard to balance both. Thanks for inspiring everyone to remember that style and beauty are about fun and feeling good!
Twitter handle: @skinnyjeansmom
Blog: http://blogs.inlandempirefamily.com/2011/07/20/beauty-finds-fit-me-foundation-aussie-and-sinful-colors/