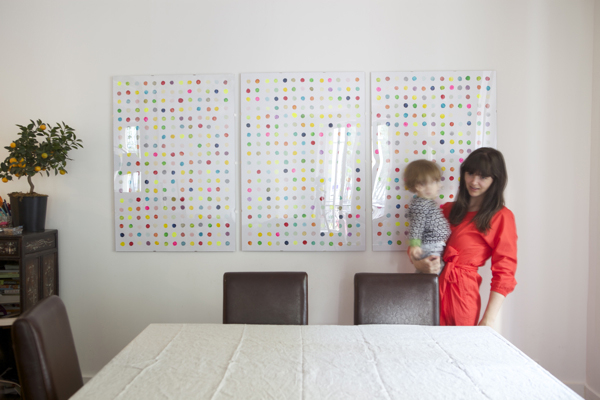
We are in a little bit of a funny spot since our home in Paris is somewhat temporary. I don’t really want to spend a lot on artwork or even framing since we’ll just be here for a year. Most of our budget is going towards practical things so art has gone to the bottom of the spending list. But we still want something to grace all our large blank white walls. I came up with a few projects I’ll be sharing in the next week or two on how to make art and frame it for cheap.
First up is this potato print artwork. I tried this technique first on a small piece of paper and I liked the result so then I made three large versions. It turned out so happy and colorful, it completely transformed the room. This project did take some time but was very affordable to make.
Materials: 5 potatoes, acrylic paints in rainbow colors, black, white, and fluorescents, paper cups, cheap brushes for mixing paints, plastic plates for mixing paints, ruler, pencil, large pieces of paper (however big you want your artwork.)
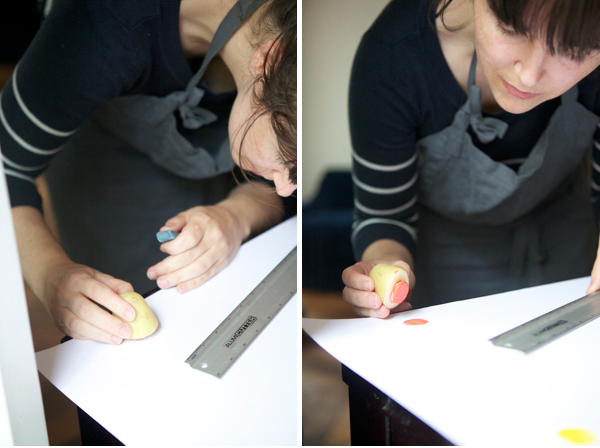
Step One: Using your ruler and pencil place little marks where you are going to stamp your potato. I did mine about 2″ apart.
Step Two: Mix paint. To get the greatest variety of colors mix your paint yourself in your paper cups. (Not to mention they come out so much prettier when they aren’t right from the tube.) Pull out your color wheel from elementary school and make darks and lights in the palate you want by adding whites or blacks or complementary colors. Be sure to add a little water so the paint is a nice consistency not too thick (and not too watery either.) I had about 18 colors in my palate 11 were bright and the other 7 were neutrals. One tip: If you are going for a colorful end result remember you need the neutrals in the artwork to make the brights really pop.
Step Three: Cut one or two of the potatoes in half and cut out a 3/4″ circle with a knife. You’ll want a few potato stamps so you can print with a few colors at the same time.
Step Four: Printing with one color at a time place the paint on the plate so you can stamp the potato in it. Then start to stamp randomly throughout the print. I kept a scratch paper nearby to test it when the stamp has too much ink. I had to erase the little pencil marks as I went and I started with 11-13 dots then went back and filled them in if I needed more of that color. It isn’t important that the stamping is perfect. Mine were a little sloppy but as long as I got in the vicinity of my pencil marking it still came out great. Continue stamping with all the colors until it is all filled out. Et voila! Your artwork is done.
Notes: Its important to do all in one sitting because your paints will dry out and your potatoes will get moldy. The painting part took 3-4 hours so get someone to help do the stamping to make it go quicker.
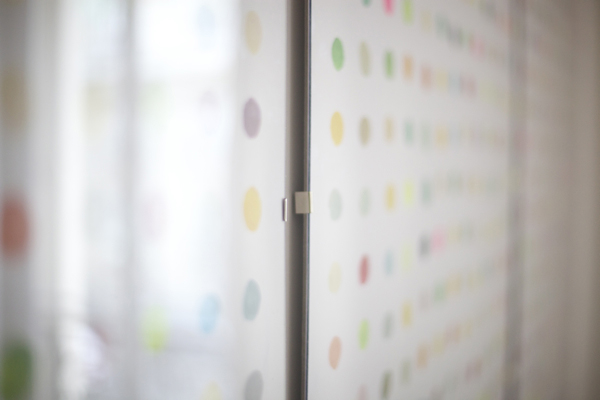
Framing: For framing we spent $6 on small metal studio clips and $30 on thin plexiglass from a Home Depot type store (they cut it to our specifications.) Then we backed it with some thick chip board, and then bound it with the studio clips. We were able to frame all three large pieces for about $35.
all photos by Oh Happy Day


Madeline
July 2, 2011
I saw your first few pictures, and then continued to read on only to be blown away that you did that artwork yourself! Love that you created it…thanks for sharing the inspiration!
nathalie van volsom
July 3, 2011
Bonjour,
Je viens de découvrir votre blog et j’adore, c’est une magnifique source d’inspiration.
Je reviendrais souvent vous rendre visite !!!
Pour ce qui est des pommes de terre, j’ai déjà fait des ateliers de ce type avec les enfants, c’est super …il faudrait moi aussi que je mette les photos sur mon blog.
Je suis plasticienne et intègre aussi beaucoup dans mon travail l’éco-design….
je vous invite aussi à découvrir mon blog qui est en refonte…
http://nathalievanvolsom.blogspot.com/
nathalie
kelli
July 3, 2011
Pretty! You could probably use wine bottle corks for the stamping, so you don’t have to use food.
Nikkie
July 3, 2011
This looks awesome! Am off buying potatoes.
heather gleim
July 3, 2011
Jordan, as usual that was a fantastic idea!
http://www.veryheatherly.blogspot.com
Jackie
July 3, 2011
This is a great idea. What a color way to brighten up any room.
One in a Brazilian
July 3, 2011
Great idea!!! I’m going to make one of these for my living room for sure.
cam
July 3, 2011
what adorable, creative and foremost simple idea! which such fabulous outcome! gotta try this! thank you! xoxo
Why not check out my little jewelry Giveaway if you like! http://some-kind-of-style.blogspot.com/2011/07/win-vintage-original-jewellery-by-vanya.html
Melificent
July 3, 2011
This is just too cute!
Definitely saving it for future reference 🙂
Lotta_heylook
July 4, 2011
So nice and creative ! Love it !
Amanda
July 5, 2011
What a delightful idea. I’ve been looking for something to make for a wall in my new apartment and I think this is exactly what I will do!
Kathy
July 5, 2011
Wow, love this! Looks great!
Mae
July 6, 2011
How clever. Looks good.
victoria
July 6, 2011
that’s freakin’ awesome. and so happy!
Phuong
July 7, 2011
I can’t wait to try this. Looking at this makes me feel so happy!
http://littlerandomhappiness.blogspot.com/
Right Florist India Pvt.Ltd.
July 8, 2011
New age gadgets are capable of doing the multitasking acts, and baby-sitting gadgets are great examples of that. Modern day baby-sitting gadgets look after the baby’s comfort by all means. Definitely this facility reduces the workload on mothers, and the visitor can just visit http://www.righttoys.in/items.asp?item=PramsStrollers_Toys_India_Online&cid=23&scat=224* and enjoy these multitasking stuffs.
cate
July 8, 2011
brilliant! seriously. i have no idea why i haven’t printed with potatoes on fabric yet, but thank you for the big push. loooooove your prints!
Camellia
July 8, 2011
Such a fun, simple, and beautiful project! Love it.
Eva
July 10, 2011
This is brilliant! Thank you for sharing.
caroline @ c.w.frosting
July 11, 2011
I love the colors & the tutorial, especially the part on how to make bright colors pop. I remember making potato stamps as a kid but it didn’t turn out anything like this! Wonderful site. Glad I found you!
Lili @ Relatable Style
July 11, 2011
Hey, I just found your blog through A Cup of Jo! This idea is brilliant, I’m looking for something just like this to spruce up my new room once we’ve moved. Oh and your blog so makes me long to go back to Paris. I’ve been there with my boyfriend a few times over the last years as we only live a 4-hour drive away. Ah, there’s never enough Paris in one’s life!!
Relatable Style
Lauren
July 11, 2011
Thanks for the great tip about needing the neutrals to make the bright colors pop- I never would have thought of that!
Courtney Koenig
July 11, 2011
I totally love it! I really want to do this too! Where did you get the studio clips and chipboard from? Thanks!
kelly
July 11, 2011
really fun!
anna
July 11, 2011
what a wonderful idea. you are so creative! i love your paris posts and i love that joanna has lead me to you – your life in paris makes me so nostalgic. i lived there for a year and a bit back in 2001 when my parents were ex-pats there and it is possibly – no definitely – the most special city in the world to me. i love all the things you are getting to do there – you will remember this time for the rest of your life! will keep following and hating you (in a good way!!)
http://www.simplystylishmom.com
Jody Nebesnik
July 11, 2011
Jordan,
I love what you mention about adding NEUTRALS to make the brights pop. I think it makes it look sophisticated, not tacky. I will remember that tip!
Addison
July 11, 2011
I absolutely love this idea! I have always heard/been told about the potato stamp trick. Your pieces really turned out vibrant and great. I am loving all the colors.
Catherine at Design Editor
July 12, 2011
Absolutely love this. I’m a huge fan of the big impact, wallet friendly clip frames. All over my house.
Daisy
July 14, 2011
This is such a fun idea! I’m moving into my first very own apartment next month, but as a poor college student it’s almost impossible to get fun wall decor without spending some dough. I’m most certainly going to try my hand with some potatoes!