


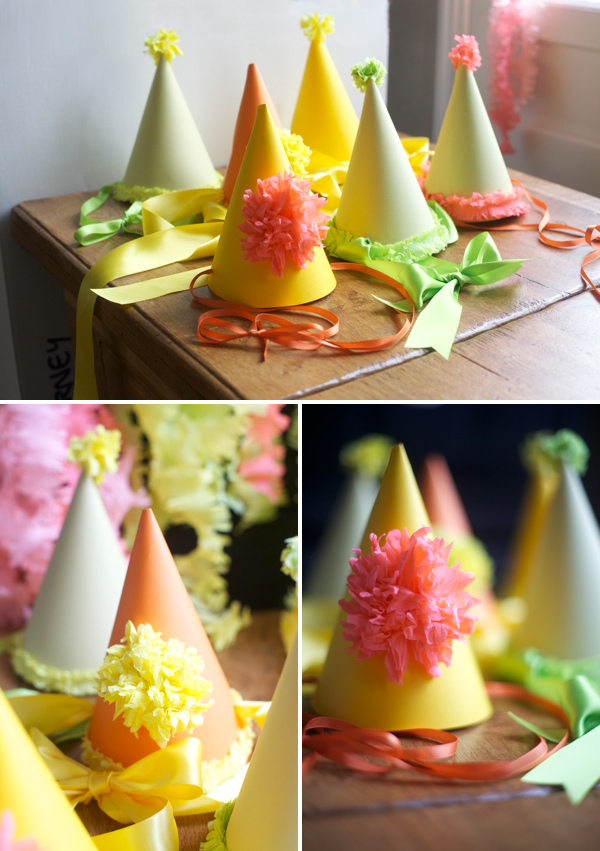
I love making party hats. I usually make my own because it is surprisingly hard to find party hats in normal colors. If I do happen to find them in the colors I like then I still spruce them up with my own fringe or flowers. Sometimes though I do prefer them plain like this one I put on Roman. I did a post on this a few years ago (here + here) but it is high time for an update.

Materials:
Downloadable Hat Template Click here to download.
Heavy Paper (like poster board or cardstock)
Crepe Paper (or you can also use tissue paper for the big flowers)
Ribbon
Pencil
String (or wire)
Scissors
X-acto Knife
Stapler

Basic Party Hat Instructions
Step 1: Download hat pdf right here. Print, then cut out the template. Take the hat template and trace it onto the heavy paper.
Step 2: Cut out the traced party hat.
Step 3: Put the tab into the slot.
Step 4: On each side of the hat make criss crossed cuts with your x-acto knife.
Step 5: Push the ribbon through each hole (I use my x-acto to do this) and tie a knot to hold it.
That is how to make a basic hat. For more of the details see below.


Once you have your hat then it’s time for the fun part: Embellishment! The fringe and ball are very easy to make, it is basically a version of the streamers (more detailed instructions over here. Here is how to do it.
Embellishment Instructions
Step 1. Cut a 1″ piece of Crepe paper.
Step 2. Cut evenly spaced fringe on each side of the 1″ piece.
Step 3. Ruffle and scrunch with your fingers then unroll the fringe.
Step 4. Take the fringe doubling or tripling it up and then staple it to the edge of your hat. (You can bend the fringe to cover the staple.)
Step 5. To make the fringey ball on top, take a section of fringe and roll it up. Then secure it tightly with string in the middle, leaving long tails of string.
Step 6. Separate each side of the fringe and poof it up until it is a little ball.
Step 7. Put the string through the hole at the top of the hat and secure the tails with a piece of tape on the inside.
Step 8. Et voila! You have a party hat!
There are other ways I decorate the hats. But they are all more or less versions of the two techniques above. I like to decorate each one differently.


They take a little bit of time to make but afterward you can keep them and bust them out for any party to make it extra festive. Happy Partying! (ps: I think this is pretty straightforward but I’ll try to answer any questions in the comments below.)


Jenna@simplybonvivant.com
February 17, 2011
Love! I use this same idea for popcorn cones for certain parties. Different patterned paper for them all and voila! You have yourself and cute throw away for popcorn…needless to say I loved the same idea for the hats. Thanks!
I Dream Of
February 17, 2011
Such happy hats! Thanks for showing us how to. Makes me want to throw a party!
Jeanne
Wonderland
February 17, 2011
Love them! Thank you so much for this idea.
Have a great day!
Lindelle
February 17, 2011
Love them!!
This is extremely timely since my nephew's birthday is just around the corner. Heck, I'd make them for my own party!
She Can't Decide
February 17, 2011
oh these are so cheerful! They remind me of those cute little girls in the lullaby league in the Wizard of Oz.
Julia | Room for Dessert
February 17, 2011
Great tutorials!!! LOVE LOVE LOVE!
Rachie @ A Chi Chi Affair
February 17, 2011
Thank you for posting this! Its so fab! Rachie xo
Deb @ PaperTurtle
February 17, 2011
SUPER CUTE!!! Thanks for the great tutorial! xo
rebecca
February 17, 2011
these hats are just so colorful! thanks for the instructions!
elizabeth / sophisticated pie
February 17, 2011
Jordan, you are totally the master of creative party elements like this. I love this post! Those streamers (and possibly the hats) are a definite must try for me. Thanks for all the inspiration!!
Nome Alone
February 17, 2011
I need more arts and crafts in my life, thank you!
gball93
February 18, 2011
these hats are the most beautiful things I've seen this week! Make me happy. Thanks!
(sorry I accidentally deleted my former comment)
Alexandra
February 18, 2011
These hats are great! I love the simplicity in the design. I am already trying to think up an excuse to make them….My family and I all have winter birthdays.
Monica Bremer
February 18, 2011
These are awesome! My daughter's excited to make hats like those. Maybe we can some glitters for the girls'. The whole ballroom will be filled with little kids and we're ready for the cakes, too. Even my sisters from Denver will be there. Thanks for sharing this!
chennai
February 18, 2011
I liked this content/ article. I would certainly recommend the same to others as well. http://www.chennaiflowerplaza.com
besquirrely.com
February 18, 2011
These colors are making me drool all over my laptop! They happily remind me of rainbow sherbet… AND got my head spinning with Easter thoughts. Thanks for the bite of inspiration. I was hungry!
Carlie
February 18, 2011
What a useful an entirely stunning (and yet approachable) tutorial! Thank you so much. My son has a birthday in April and these will be great fun to make together!
Hannah
February 18, 2011
What a lovely idea, thanks for sharing!
Tuesday
February 18, 2011
I would love to make these for my boyfriends 28th, He may not be so keen, Love them though Thanks!
Rachael
February 18, 2011
Thank you so much for this post! I love these. And thank you for the link to Roman's birthday photo – he is just adorable!
Lisette
February 18, 2011
You inspired me to make these cards:
http://lisetteandcameron.blogspot.com/2011/02/inspiration-vs-jealousy.html
Thanks,
Lisette
{éclat} event design
February 19, 2011
Love, love, love this!!!! Thank you so much for sharing!!
zhing
February 21, 2011
i love the colours! and amazed at how gorgeous the pictures of your tutorials look! 🙂
thanks! 🙂
www.germanyflowershop.com
February 22, 2011
Flowers and gifts never miss the priceless smiles on the faces of your loved ones in Singapore. Commemorate and bring festivity to their lives, no matter whether with a reason or without it. For details, visit http://www.singaporeflowershop.com
Mrs. Webster
March 4, 2011
Thanks for the template and ideas! I just made one for my daughter's first birthday. You can check it out here: http://emmalee-web.blogspot.com/2011/03/project-52-one-year-old.html
crystal b.
March 9, 2011
Can I tell you how much I just love your blog! I am so hoping to purchase one of your husband's beautiful pieces of art one of these days. Love these party hats! Can't wait to make them.
crystal b
Krista Cheatham
March 17, 2011
Thank you so much. I'm planning my daughters first birthday party, and happened to come across your blog. These hats are perfect!
http://www.fowndlove.blogspot.com
SkyBlueSeed
March 21, 2011
Thanks for the step-by-step tutorial! Just posted some pics from my daughter's 4th birthday party of these hats – she loved them! can't wait for an excuse to make them again~
em
March 24, 2011
Thanks Jordan! I am so making the streamers and the hats next month for my daughter's birthday!
Marbuch
May 5, 2011
Hey! I used a couple of your ideas for my daughter's first birthday party. Please take a look:
http://thejourneysisters.blogspot.com/2011/05/adielis-rainbow-party.html
Thanks!
Mercedes