


I’m a little embarrassed every time somebody asks me for a business card. Even though I have a letterpress I haven’t made myself business cards in 4 years! Last week I realized I have several conferences and meetings coming up in the next few months (like Alt Summit and Maker’s Summit) and decided to just make some really basic cards. Just a logo on the front and name and email on the back. After they were printed I felt like they needed a little something-something and got an idea for edge-painting stripes on the sides. I loved that when you separate the cards they look like they have little colored confetti around the edges. It was just an idea and I wasn’t sure if it would work but I was really happy with how it turned out. The one disclaimer is that it is really time consuming. Don’t commit to this project unless you need to start a new TV series on DVD.


There are a few different techniques for edge painting. I have had the best results with the dry brush technique (over spray painting etc) For best effect the paper needs to be a thick stock. I usually use Crane lettra for my letterpress. They make a really thick 220 pound duplex stock that really looks great for edge painting. IF you just want to paint the edges one color you follow the instructions but just skip the part about about the tape.
Materials Needed: Artist’s Tape, x-acto knife
, acrylic paint
, small stiff paint brushes
, clamps
, something strong to clamp down (we used pieces of acrylic) , a paper plate or cup for mixing paint
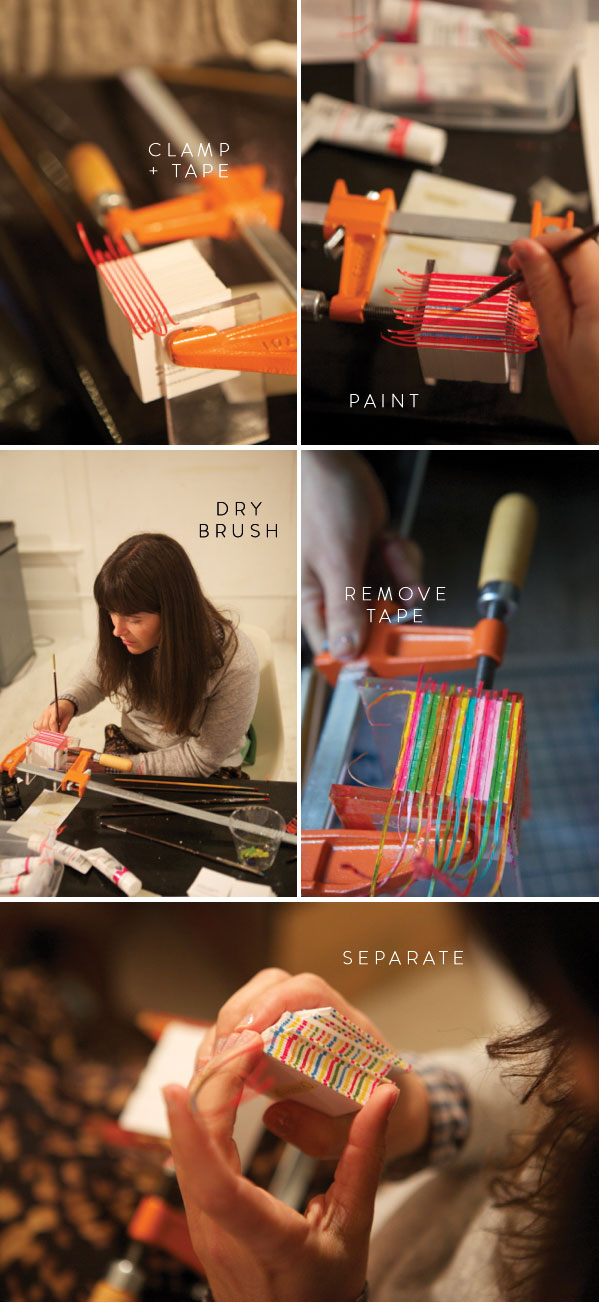
Step 1: Take a stack of cards and jog two sides into place so they are flat and even. Clamp the two acrylic pieces down to make the stack of paper nice and tight.
Step 2: Take painter’s tape and using a straight edge and exacto, cut into thin strips (make them the size you want in between the stripes.) Space out strips on both flat sides of the stack of paper.
Step 3: Paint each strip a different color using dry brush technique. Only put a little paint on the brush and put thin layers of paint until it is completely covered
Step 4: Remove tape, unclamp and separate cards so they don’t stick together. Voila!


Allie Middleton
January 16, 2014
You’re a flippin’ saint to spend all that time doing those!!! But so worth it! You’re taste is out of this world! I love it! And congratulations on your house. Everything you’ve posted i’m OBSESSED with 🙂
-allie
http://www.piperandscoot.com/
Valerie | Lily on Fillmore
January 16, 2014
though time consuming, they turned out great! xx
kristin
January 16, 2014
So creative!! Love how they turned out!
Caitlin
January 16, 2014
these look absolutely gorgeous. i know they were so time consuming and you wanted to pull your hair out, but the end result completely shows your creativity and originality!
Lisette Wolter-McKinley
January 16, 2014
Such a labor of love, but these look like they turned out fantastic. Nice work!
Michel
January 16, 2014
these are adorable!!!!
Sara Cormier
January 16, 2014
I am in love with these! So cute!
Misse Daniel
January 16, 2014
Gorgeous! I did something similar but not quite as complex. I hope that I finally get to meet you at ALT!
Shena
January 16, 2014
Probably dumb question, but what is dry brush? You just go over the paint again, but this time with a dry brush?
It’s the idea that you don’t really use water and just use a little bit of paint at a time. Your brush stays “dry.”
Diana
January 16, 2014
I love these! I would love to gold edge some of my cards and now I know how!
xo
Diana
http://unusuallylovely.com
Shannon K
January 16, 2014
Gah! These are SO glorious! Well done!
Jess
January 16, 2014
All I can say is….WOW!
Kerry
January 16, 2014
Wow, what a wonderfully simple idea. And so effective too! x
Angel Y.
January 16, 2014
These are beautiful! Such a wonderful idea.
Erin Godbey
January 16, 2014
Love the confetti look!
So incredibly excited to hear you speak at The Makers Summit. Anyone other Oh Happy Day fans attending?
http://themakerssummit.com
mika
January 16, 2014
these are amazing!! but i would totally hoard them if i ever made them myself! i applaud your patience and perseverance!! 🙂
Christa
January 16, 2014
Love these!! I was curious how you had it set up to do that many, such a great way to do it!! They’re so fun!
xo
Christa
http://www.gardeniasandmint.wordpress.com
Sherry
January 16, 2014
As I scrolled past this on Pinterest I thought it was a tutorial on painting the cups!
I love both! lol!
Milan Lee
January 16, 2014
Worth it! Go Oh Happy Day!
giulia
January 16, 2014
you are the most amazing!!!!!!!!
CB
January 16, 2014
These are gorgeous. Nice job!
Bee Eastman
January 16, 2014
Tedious job that makes your new cards look gorgeous. Great job!
jessie
January 16, 2014
lovely idea and nice business cards lady 🙂
STEL STYLE
January 16, 2014
amazing you are so creative!!!
DIY ON MY BLOG
http://www.stelstyle.com
Becca
January 16, 2014
These look AMAZING! I keep meaning to whip up new business cards and I’m so keeping this idea in mind when I do!
XOXO
Becca | Ladyface Blog
CJ (30 Days of Smiles)
January 16, 2014
Wow, they look fantastic, well worth the effort, they stand out from the rest.
Cheryl
January 16, 2014
So awesome!! Truly one of a kind.
Brooke
January 16, 2014
Wow, these are gorgeous!!
Nicoletta
January 16, 2014
I’m glad I’m not the only one who does time consuming gotta make this pretty no matter how long it takes me things like this! HA! Super fun idea!
isaprincesss
January 17, 2014
What a patience!!! Wonderful cards!!!
Helene
January 17, 2014
Waou, such a good idea i love it ! 🙂
Carmody
January 17, 2014
These are beautiful!
2moiselles
January 17, 2014
Wow, they are gorgeous!! I love this idea!
engquist@see what i sea designs
January 17, 2014
Well, that just decided it. I officially need a letterpress machine, the skill set to use it, and a place to store it. (: Awesome as always, Jordan!
P.S. how comes the house? I still can’t get over all of that woodwork!
kim @ DESIGN + LIFE + KIDS
January 17, 2014
They look perfect! I think they were worth the hard work and it’s definitely a card that won’t get tossed aside. 🙂
Carol
January 17, 2014
These made me giggle. Thanks for sharing this tutorial, Jordan.
Question: Have you edge painted with letterpress inks such as Van Son Rubber? I haven’t myself but wondering about Pantone’s mixing formulas and using acrylic paint….
lyndsay // coco cake land
January 17, 2014
so much cuteness! you’re amazing, jordan!
Alice
January 17, 2014
Love this- what a creative idea!!
gris-gris
January 18, 2014
Colorful is wonderful
Sami (Poor & Pretty)
January 18, 2014
What a fabulous idea! And so easy too! Thanks for sharing this!
Renee
January 21, 2014
So clever!! I love this idea!
Laura | Artifact Uprising
January 21, 2014
Ahh, this is mighty fabulous! Way to to turn something boring into a tangible party! Brilliant!
Miami Printing
January 21, 2014
Your business card just look much fun and better, thank you for the tip.
Corey Savage
January 22, 2014
Great idea! Your business cards should reflect what you do and if you are in a creative business, the cards need to have an element of creativity to them.
Paulette Leto
January 22, 2014
That really looks awesome! I think it’s definitely worth the time and effort to get the stripes onto the edges of your business card like that. I really like how that turned out!
Virginia (The Heartographer)
January 24, 2014
I just love this so much, Jordan! I’ve been wanting to get edge-painted letterpressed cards for AGES now, and yet it’s never even occurred to me to do anything funky or interesting on the edges. My color would be red, and now I’m thinking I could even do some kind of diagonal whatnot that makes it kind of like an old-timey Express Mail package, you know? Or maybe it was Air Mail. Hopefully you know what I mean. 🙂 LOVE how yours turned out!
Beauty Follower
January 26, 2014
Great idea!
http://beautyfollower.blogspot.gr/