


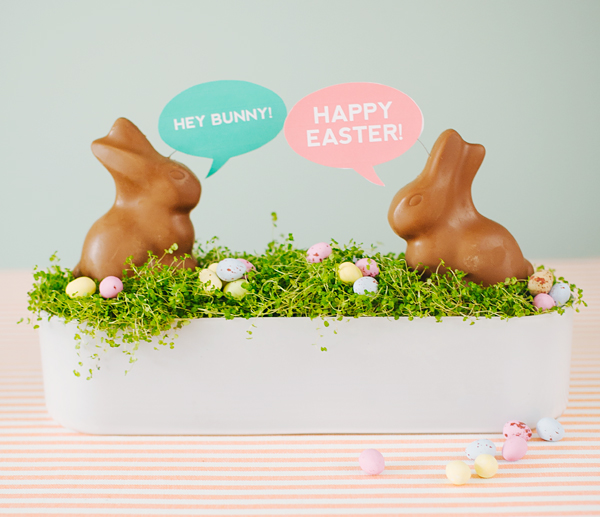
I always love an unexpected, fun centerpiece; so for this Easter I created this easy conversation bunnies DIY. It’s inexpensive and won’t take more than half an hour to create! Make a centerpiece or mini chocolate bunny place settings with custom printable speech bubbles. A fair warning: since these are made with actual chocolate bunnies, you’ll need to consider the place of your Easter brunch table – direct sunlight wouldn’t be too great for these babies!

Materials: chocolate Easter bunnies, free speech bubble printables, x-acto knife
or scissors, metal wire
, tape, glue
, potted greens/grass or moss, a centerpiece vessel, box or flat vase, pretty candy Easter eggs
Step 1: Print and cut out the free printable conversation bubbles
Step 2: With tape attach a piece of metal wire to the back of one bubble
Step 3: Place a mirrored speech bubble on top and fix it with paper glue (that way your centerpiece will be pretty from both sides of the table)
Step 4: Unwrap your chocolate bunny carefully (it’s best to store it in the fridge before you start crafting)
Step 5: Carefully stick the wire into the chocolate bunny, if necessary bend the wire slightly to get your speech bubble into the perfect position
Step 6: Repeat previous steps with a second bunny
Step 7: Grab some pretty potted greens or moss and your centerpiece vessel
Step 8: Arrange greens in your vessel to create a mini meadow for your bunnies to play in
Step 9: Place your bunnies on top, then add some pretty candy eggs for an extra touch

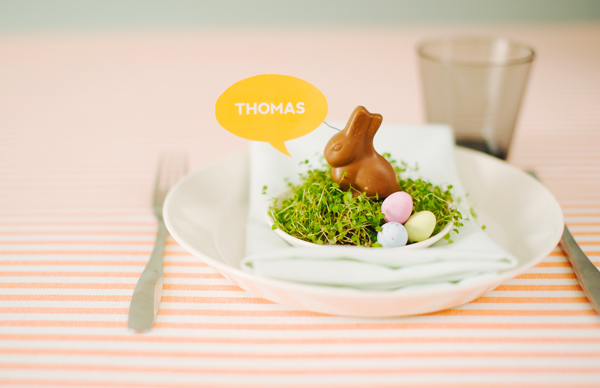
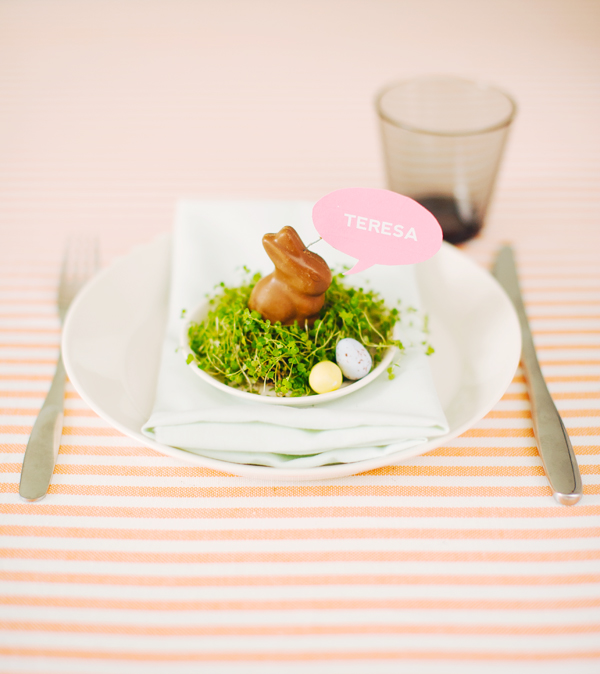
Super-easy, right? And your kids or chocolate-loving guests will be so happy when they can dig into this after your meal! If you want to be extra nice to them, make personalized mini chocolate bunny place settings for everybody!
You will need to download this free font (nevis) before you start, then download the printables, open in preview (on mac) or Adobe Reader (on PC) and fill in your guest names in CAPS. After that follow the steps for the centerpiece, but place your mini bunnies in nests of greens or directly onto the plates.
Happy Easter everybody!


Ariane
March 17, 2014
Nice and easy! Thank you for sharing. I’ll do it for sure!
Emmie {Blue 11 Interiors}
March 17, 2014
So cute! I might try this with some non-edible bunnies so I can keep them out until Easter!
Georgina
March 17, 2014
They’re adorable!!!! I love the idea!
Madeline Audrey
March 17, 2014
I LOOOOVE these darling little place cards! Absolutely darling!
Ana
March 17, 2014
BRILLIANT and adorable. Love it!
Jess
March 17, 2014
This is truly the cutest idea ever!!
Britney
March 17, 2014
This is the coolest idea I’ve ever seen! Definitely having an easter shindig this year and doing this!
Rebecca Sian
March 17, 2014
Oh! I love these. Particularly the place names one, hoping I will be in my house in time to make these for Easter.
chloe
March 17, 2014
what an adorable idea! i’m not too crafty, but this looks like something even i could create!
thanks for sharing 🙂
xox
chloe
http://popcosmo.com
Kristin
March 17, 2014
Cute! Such a great idea. Makes me happy about all the ways this can be used.
Waimihi
March 17, 2014
i loooove this font!
Erin
March 17, 2014
such a simple, sweet idea! 🙂
danielle @ this picture book life
March 18, 2014
These are so great!!