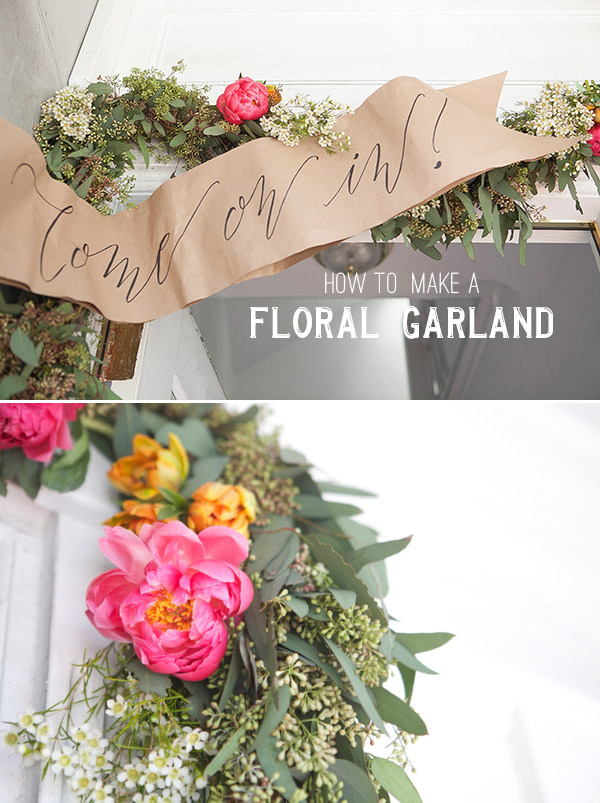
Here is the DIY from the floral garland and banner we made for my housewarming party. It was really fun project to make and has such a big impact for guests walking up to your door. Sometimes in the past I’ve made my own garland (instead of ordering it pre-made) but I’ve learned that most of the time there isn’t that much savings to have someone else do it. It depends what kinds of access you have to a a flower mart. This whole project cost a little over $100 and took about an hour. The sign is fun because we wired it so it can be wavy and scroll-like which gives it a cool look.
Keep reading for full instructions and more photos.
Keep the garland in a cool and damp place and spritz with water to keep fresh. It has about 24 hours before it starts to look a little tired.
For the Floral Garland:
Materials: Eucalyptus Garland, Peonies, Tulips, Wax Flowers, Floral Wire, Water Tubes
Step 1: Order a Eucalyptus garland from a florist or floral distributor.
Step 2: Cut stems and remove leaves below the water line. Add a water tube to help the flowers stay fresh throughout the day.
Step 3: Once your flowers are all prepared tuck them into the garland and wire securely. Tip: If you are using it above a doorway, hang the garland first before wiring in the flowers. Wire underneath (not over the top) of the Eucalyptus leaves so that they are loose and can cover the wired and tubes. Secure the wire tightly and repeat clustering and wiring the flowers in until you are happy with how it looks.
For the Sign:
Materials: Roll of Brown Kraft Paper, X-Acto Knife, Pen (for lettering,) Aluminum Craft Wire, Masking Tape,
Step 1: Write out your words for your sign on the Kraft paper.
Step 2.: Cut a long rectangle around the words you’ve written. Cut another piece of Kraft paper in this same size (it will cover the back of the sign and make it look cleaner.)
Step 3: On the back of the written sign, lay down the wire around the edge of the paper. Be sure to leave extra room on the sides if you want to cut a shape on the edges.
Step 4: Tape the wire down.
Step 5: Roll up small pieces of tape in order to attach the second piece of Kraft paper (the back of the sign.) Make sure the wire and tape are covered by this paper.
Step 6: Bend the sign into the shape you want and put it up!
Photography by Paul Ferney + Heather Zweig for Oh Happy Day
Garland by Jordan Ferney + Irene Yu
Produced by Stacy Wichelhaus
Sign Crafting by Caitlin Barker


Kicki
April 26, 2013
Beautiful!!
Jill
April 26, 2013
So pretty! Not sure I’d take this on myself given the cost, but done with fake flowers to last all spring might be nice!
Karla
April 26, 2013
It’s refreshing to see this tutorial sharing real flowers….. Lovely lovely lovely!
Lynne
April 26, 2013
I really love your philosophy of choosing just a couple of high-impact things for the party. So beautiful!!!!
Asmita
April 26, 2013
Stunning!
Colonial House
April 26, 2013
So thankful you posted the instructions! We are going to try to make one next week. Thanks for the inspiration!
Kris {Driven by Décor}
April 27, 2013
Gorgeous!!!
deana
April 27, 2013
im loving the floral decorations ive been seeing around. This is so cute!
-Deana, from Birds&Oxfords
Alba
April 29, 2013
I love this garland+sign. However, I’m also super curious where your table linen is from? I am really digging that bright pink!
It’s from Anthropologie!
Amy
May 3, 2013
Hello! Everything about this is just lovely! I’ve wanted a garland just like that for my wedding and I wasn’t quite sure how to go about doing it- so thanks for this post. I was wondering where you acquired your Eucalyptus garland? I read that you recommend a florist or floral distributor. I was hoping to find something online. I’m on the east coast, so what worked for you might not work for me. Just curious! Thanks!